Unsplash API with Python
Published: Jul 20, 2021
Last updated: Jul 20, 2021
This is Day 2 of the #100DaysOfPython challenge.
In today's morning post, I am opting to begin to shift how I generate my blog post images. To do so, I will making use of an unofficial Python Unsplash API by salvoventura.
This post won't cover the entire shift, but it will look into how I will grab the source image from Unsplash.
Prerequisites
- A registered app with the Unsplash developers site.
- Familiarity with Pipenv - see my post for the minimum you will need.
- An environment setup with JupyterLab.
Getting started
Let's create the pyunsplash directory and install the Unsplash API along with other required packages to install and download the image.
# Make the `pyunsplash` directory $ mkdir pyunsplash $ cd pyunsplash # File for env file - be sure to Git ignore this file $ touch .env # Init the virtual environment $ pipenv --three $ pipenv install requests pillow pyunsplash python-dotenv $ pipenv install --dev jupyterlab # Startup the notebook server $ pipenv run jupyter-lab # ... Server is now running on http://localhost:8888/lab
The server will now be up and running.
You will need to also grab your access key from your Unsplash app from the developer portal. Once you have it, update your .env file like so:
UNSPLASH_ACCESS_KEY=<your-access-key>
It will be used to power the pyunsplash package.
Creating the notebook
Once on http://localhost:8888/lab, select to create a new Python 3 notebook from the launcher.
We will create four cells to handle four parts of this mini project:
- Load the environment variables.
- Use the Unsplash API to grab the source image.
- Save the image to the parent directory.
- Display the downloaded image in the notebook using Pillow.
Load the environment variables
Assuming that our notebook is in docs/unsplash_api.ipynb file, we will create a new cell and paste the following code:
# Load in the required dotenv vars import os from os.path import join, dirname, abspath from dotenv import load_dotenv dotenv_path = join(dirname(abspath("__file__")), '../.env') load_dotenv(dotenv_path) UNSPLASH_ACCESS_KEY = os.environ.get("UNSPLASH_ACCESS_KEY")
Running this cell will read the .env file in the parent directory and load the UNSPLASH_ACCESS_KEY value.
Fetching the link for a random photo
We can create a new cell that will load the pyunsplash package and grab a random photo from Unsplash.
from pyunsplash import PyUnsplash # instantiate PyUnsplash object pu = PyUnsplash(api_key=UNSPLASH_ACCESS_KEY) photos = pu.photos(type_='random', count=1, featured=True, query="splash") [photo] = photos.entries print(photo.id, photo.link_download)
This will print out the photo ID along with the value of the link for download.
Download the image to the parent folder
We can make use of the requests package to download the image and write it to file.
import requests response = requests.get(photo.link_download, allow_redirects=True) open('../unsplash_temp.png', 'wb').write(response.content)
Finally, we can display what that image looks like:
from PIL import Image display(Image.open('../unsplash_temp.png'))

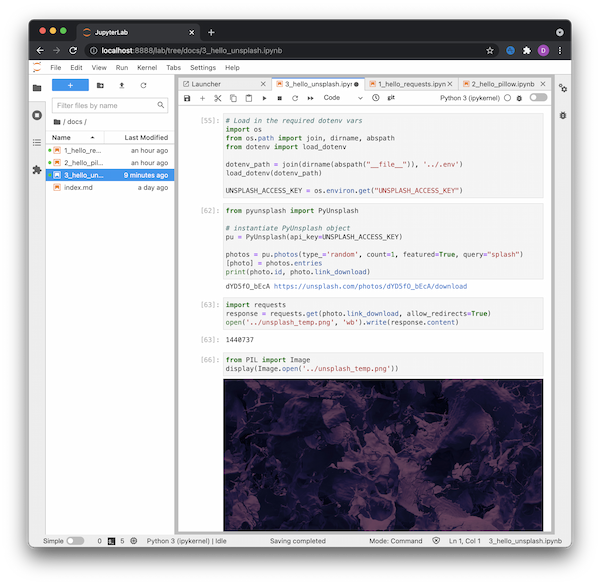
Executed Python notebook
This photo is the photo that I am using for this blog post.
Summary
Today's post demonstrated how to use the pyunsplash package to fetch a random image based on a keyword and save it to disk.
I will be writing further posts in the coming days on how we can compose multiple images together to create a more complex effect along with text.
Resources and further reading
- Unsplash developers site.
- The ABCs of Pipenv for the minimum you will need.
- Hello, JupyterLab.
- salvoventura/pyunsplash


Dennis O'Keeffe
Melbourne, Australia
1,200+ PEOPLE ALREADY JOINED ❤️️
Get fresh posts + news direct to your inbox.
No spam. We only send you relevant content.
Unsplash API with Python
Introduction
